In the first article of this “IT credibility through project success” series I outlined three key components required of you in delivering projects successfully in order to gain IT credibility.
1. Build an appropriate project schedule and manage projects to deliver on time, within budget and meet your client’s expectations.
2. Communicate the status of active projects.
3. Demonstrate your organization’s project success rate and the benefits derived from your efforts.
In this post we will discuss the first component – building an appropriate project schedule and managing projects.
First, let’s identify a few key tips that will help you manage and deliver projects successfully:
- One of the biggest reasons projects fail is because IT people do not clearly define the goals, objectives and specific deliverable of a project. We charge off to do the work before getting it all defined and agreed upon by the project sponsor, , , when this happens, the project is already doomed.
- IT people like to be “exact”. To manage projects successfully, you have to be conservative and add buffer to the budget and timelines. There is a golden rule to follow when managing projects. Always remember, , ,
projects take longer and cost more than you think they will
every time
- Conduct a Project Kickoff Meeting to get project team members on the same page and to set their expectations on what you expect from them. It may be their first real project so spell out in clear terms that you expect them to have their tasks completed on time.
- Explain to the team that asking for help is a sign of strength, not weakness. IT employees don’t like to ask for help, but asking for assistance early gives you an opportunity to overcome something that might cause the project to be late or over budget.
- Projects don’t get completed on their own. Good project managers anticipate early and often and they push the project along by having weekly project status meetings to keep their projects on target.
- Identify key bottlenecks or critical tasks in the project and get after them quickly. These are the culprits that jeopardize completing projects on time.
- Hold project team members accountable and expect them to complete their tasks on time. In the Project Kickoff Meeting, get commitments from everyone that they can complete all their assigned tasks by the designated due dates.
- Inspect, , , inspect, , , inspect. Remember, what gets inspected gets done. If you are surprised to discover someone is late on a task at the status meeting, , , shame on you for not inspecting. If you don’t inspect, you will always be surprised and surprises usually spell trouble.
- Managing client expectations is a key ingredient for project success. To do this, you must communicate effectively and regularly.
Simple tool for building a project schedule
Developing an appropriate project schedule and using it to manage the project is key.
I use a very simple tool to develop project schedules. It’s an Excel spreadsheet template. I’m experienced with Microsoft Project but I’ll always revert back to this spreadsheet tool whenever possible because it’s quick and easy.
Believe it or not, before we had laptops and spreadsheets I used a paper form similar to my spreadsheet template and a pencil (and eraser 🙂 ) to manage many large computer installation projects as an IBM Systems Engineer.
Managing a project schedule is not about the tool as much as going about your work appropriately and in a manner that works.
Here is what my blank project schedule template looks like, , , click on the image for a closer look:

There are three key parts:
1. Task – These are the specific tasks required to complete the project. I organize my tasks by major groups or categories. For example, in a large systems conversion project, I might set up a group of tasks by the following categories:
- Ordering and Setup
- Infrastructure
- Programming
- File Build
- Training
This organizes the tasks into logical groups and saves time when you work through a project status meeting to determine the status of this week’s tasks that are due to be completed.
My approach is to quantify the tasks to complete a project first. I focus on identifying and listing all the tasks first and then work from there.
Something else to consider as you develop the tasks is that some tasks will be bottlenecks or key tasks that can jeopardize your project if they are not completed on time. You want to identify bottleneck tasks as quickly as you can and place priority on getting them completed early. Eliminating a bottleneck may actually give you a time advantage.
2. Responsibility – Each task needs one person assigned to be responsible in getting the task completed. It doesn’t have to be the person who actually works on the task, but it needs to be someone on the project team who sits in the weekly status meetings so you can look the person in the eye when you hold them accountable for the task.
Another note on this, , , keep responsibility for each task to 1 person, even if multiple people work on the task. It’s hard to hold more than one person truly accountable for a task and it’s easy for them to point at the other person if a task is not completed.
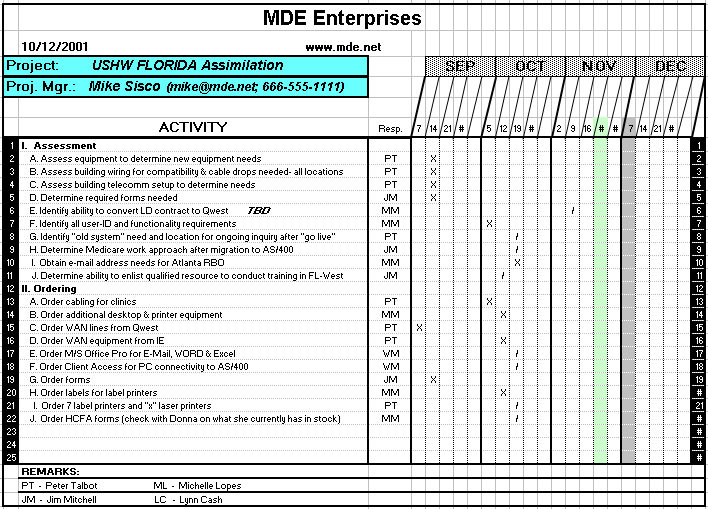
3. Timeframe – These are the columns you see titled Month-1, Month-2, etc. Under each month, there are 5 columns. These are weekly columns for the month, , , five because some months have 5 weeks. I use Friday dates. More on this in a second.
So, let’s say the project starts in January and the first Friday is the 7th. I would put in the weekly columns: 7, , , 14, , , 21, , , 28 underneath the month of January to designate each of the Fridays in the month of January. Put in the Friday dates for the other months that are required to complete the project.
Once you have the week ending dates established, , , work through each task to determine the week the task needs to be completed in order to complete the project successfully. What I do is to key or write in a “/” (slash). When the task is completed, I change the “/” to an “X”. This creates a visual effect that makes it very easy to see the status of all the tasks. You will see an example of this in a minute.
You may have a very large project, , , 20 pages or more with hundreds of tasks. By using the “/” and “X” notations, you are able to work through a project status meeting quickly and thoroughly. You just focus on the tasks that are due this week and possibly next week plus bottleneck tasks you know exist in the future.
I mentioned bottleneck tasks earlier. You may want to highlight these by shading the cell background of the completion time to bring attention to the team that this is a key task that can cause the project to fail. It also makes the task easy to spot in status meetings so you can ask about its status weeks ahead of when it is due. Remember the point I made earlier, , , get after these bottleneck tasks quickly!
I also mentioned that I use Friday dates. Friday is the last day of the work week in the US so I show the tasks as needing to be completed by the end of the week. I hold my weekly status meetings early in the week on Mondays or Tuesdays and as we work through this week’s tasks it gives us a few extra days to complete a task if it’s not already completed.
Project managers have to push the project to completion, , , it’s not going to be completed on time if you don’t push to make it happen. By holding project status meetings early in the week and showing tasks required to be completed by Friday it gives you additional time.
Quite often, project team members will procrastinate and wait until the last minute to start focusing on their tasks, , , they think they have plenty of time. This can cause a project to fail because sometimes a task is bigger or more complex than anticipated and takes longer to complete. The additional few days after a project status meeting will help you keep the project on track.
Below is the first page of an actual project where you can see the visual effect of what I described in designating completed tasks with an “X”. You can easily see that we are about to hold a status meeting for the week of October 19th. Click on the image if you need to see a larger version.
In the next post we will talk about communicating the status of active projects and I’ll share a simple tool I developed and used recently to do this.
 More details of the entire project management process and customizable tools I use are available in my book, IT Project Management: a practical approach